Ghost Mannequin Photography
Master ghost mannequin photography with our step-by-step guide. Learn tools, techniques, costs, and best practices to create stunning 3D product images.
.avif)

Ever wondered how fashion brands make clothes look like they’re floating—perfectly shaped, with no mannequin or model in sight? That’s the magic of Ghost Mannequin Photography. This technique brings your garments to life, showing every curve, seam, and detail in a clean, professional way. Whether you’re running a small online store or shooting for a big fashion label, mastering the ghost mannequin effect can transform your product images from average to irresistible. In this guide, we’ll break down the entire process—from setup to shooting, editing, and pro tips—so you can create stunning 3D product shots that stop shoppers in their tracks. Let’s get started.
What is Ghost Mannequin Photography?
Imagine scrolling through an online clothing store and seeing a jacket that looks like it’s floating in mid-air—perfectly shaped, no mannequin, no model, just the product in all its glory. That’s the magic of Ghost Mannequin Photography.
This technique, also called invisible mannequin photography or the hollow man effect, blends professional shooting with smart post-editing to make clothes look naturally filled out—without anything distracting in the frame. It’s the go-to choice for eCommerce clothing photography because it gives shoppers a realistic, 3D view of how garments actually fit and fall. And here’s the best part—you can use it for everything from a simple T-shirt to a designer coat, and it will still look premium.
Understanding the Ghost Mannequin Effect
At its core, the ghost mannequin effect is a clever visual trick. You start by photographing your product on a mannequin. Then, in post-production—often using Photoshop ghost mannequin editing—you remove the mannequin but keep the garment’s shape intact.
Think of it as giving your products a “virtual model” that never blinks, moves, or needs retouching. This approach also works beautifully with AI ghost mannequin removal tools, letting you speed up editing without losing quality. The result? A sharp, 3D product image that makes shoppers feel like they can reach out and touch the fabric.
Why It’s Popular in eCommerce Fashion Photography
When someone shops online, their decision often comes down to one thing—how well they can picture themselves wearing the item. Ghost mannequin photography makes that vision clear.
Unlike flat-lay images that can look lifeless, or mannequin shots that feel staged, this style keeps the focus solely on the product. The shape, fit, and fabric details all stand out. That’s why so many apparel brands—from indie labels to global retailers—use this method to boost click-throughs and conversion rates. Consistent, high-quality images also help your store look professional, which builds trust and keeps customers coming back.
Benefits Over Traditional Mannequin or Model Shots
Here’s why brands are switching:
- Lower costs – Skip expensive model fees and large production crews.
- Perfect consistency – Every product photo matches your brand style.
- Product-first focus – No distractions, just the clothing’s design and details.
- Scalable workflow – Ideal for large catalogs with hundreds of SKUs.
- Adaptable to any garment – Works for shirts, pants, jackets, dresses, and more.
With invisible mannequin photo editing, you’re not just saving time—you’re creating a polished, high-impact shopping experience that makes customers stop scrolling and start adding to cart.
Tools and Equipment You Need
If you want your ghost mannequin photography to look like it came straight from a premium fashion catalog, the right gear is non-negotiable. You don’t need the most expensive kit, but you do need the right combination of mannequin, camera, lighting, and editing tools. Think of this as your starter pack for creating that perfect hollow man effect photography that gets customers to click “Add to Cart.”
Choosing the Right Mannequin (Including Female Ghost Mannequin Options)
Your mannequin is your silent model. It shapes the garment, sets the posture, and decides how convincing your invisible mannequin photography will look.
- Match the mannequin to your market – If you sell women’s apparel, a female ghost mannequin with realistic curves is key. For menswear, look for broader shoulders and a straight torso.
- Detachable parts are a game-changer – A removable neck, arms, or chest panel makes it easier to capture those hidden garment sections you’ll need later in ghost mannequin editing.
- Neutral colors work best – White or light grey mannequins avoid color casting onto fabrics.
The right mannequin doesn’t just hold your clothes—it makes them look alive.
Cameras, Lenses, and Tripods for Crisp Results
You can’t edit in sharpness you never captured. For eCommerce clothing photography, aim for a DSLR or mirrorless camera with at least 20MP resolution. Pair it with:
- 50mm prime lens for a natural perspective.
- 85mm lens for flattering product close-ups without distortion.
- Sturdy tripod to lock in framing and keep every shot perfectly aligned.
This consistency makes your Photoshop ghost mannequin tutorial process smooth—no endless re-aligning in post.
Lighting Setup for Shadow-Free, Professional Shots
Lighting is your secret weapon. Even the best mannequin and camera won’t save you from bad light.
- Soft, even light – Use softboxes or umbrellas at a 45° angle to the mannequin.
- White backdrop – Reflects light evenly and keeps editing clean.
- Reflectors – Fill in shadows and keep colors accurate.
A proper mannequin photography lighting setup means your product looks true-to-life—making shoppers trust what they see.
Using a Ghost Mannequin App or AI for Quick Edits
Editing is where the mannequin disappears and the magic happens. Manual Photoshop work gives full control, but if you want speed, try ghost mannequin apps or AI ghost mannequin removal tools.
These tools:
- Automatically mask and remove the mannequin.
- Merge multiple angles for a 3D look.
- Cut your editing time from hours to minutes.
You can still add final touches—adjusting shadows, refining edges—so the image looks handcrafted, not computer-generated. The result? Studio-quality images ready to boost your click-through rate.
Preparing for the Shoot
Great ghost mannequin photography starts before you even pick up the camera. The setup you create now will decide how fast you edit later, how professional your images look, and how many clicks your products get online. Think of this stage as dressing your product for a red-carpet moment—it’s all about presentation, precision, and consistency. If you get this right, the rest of the process becomes smoother and faster, whether you’re using manual ghost mannequin editing or AI ghost mannequin removal.
Selecting and Styling the Garment
Your garment is your hero. If it looks sloppy in person, it will look sloppy online—no amount of invisible mannequin photo editing will fix that.
Here’s how to get it camera-ready:
- Check for flaws – Remove lint, loose threads, and any marks. A spotless garment builds trust in eCommerce clothing photography.
- Steam or iron – Crisp lines make the hollow man effect photography look premium.
- Shape it like it’s worn – Use clips, pins, or tissue paper to fill sleeves and collars so the fabric drapes naturally.
Shoppers make snap decisions based on visuals. A well-prepared garment instantly makes your store feel high-quality.
Posing and Positioning on the Mannequin
This is where you bring the garment to life. The way it sits on the mannequin determines whether it looks flat or dynamic.
- Align seams and hems – Straight, even lines signal craftsmanship and quality.
- Maintain symmetry – Balanced shoulders and even sleeve length create visual harmony.
- Feature key details – Position embroidery, prints, or textures front and center so they stand out in your Photoshop ghost mannequin tutorial edits.
Background Setup for Easy Post-Editing
Your background isn’t just a backdrop—it’s your editing assistant. A clean, consistent background makes ghost mannequin editing faster and your images more clickable.
- Go neutral – White or light grey is perfect for focusing attention on the product.
- Light it evenly – Use your mannequin photography lighting setup to remove unwanted shadows and keep colors accurate.
- Declutter completely – No extra props unless they’re intentional. Anything in the frame that’s not the garment will slow down post-production.
A seamless background doesn’t just speed up AI ghost mannequin removal—it also helps your store look polished and trustworthy.
Step-by-Step Ghost Mannequin Photography Tutorial
The real magic of ghost mannequin photography happens when you capture the right shots in the right order. Each angle and detail you photograph now becomes a puzzle piece you’ll later combine in editing. The better your shots, the easier your ghost mannequin editing will be—whether you’re working manually in Photoshop or using AI ghost mannequin removal tools.
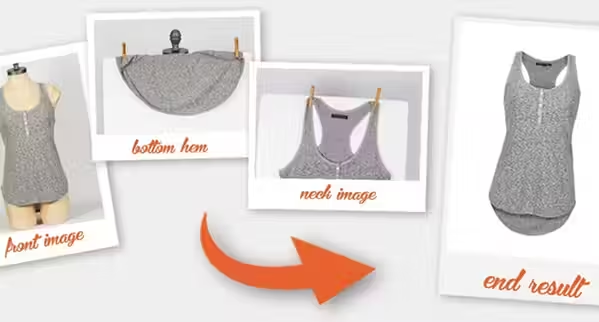
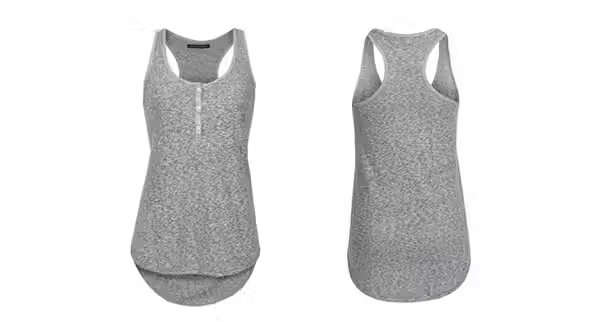
Photographing the Front, Back, and Interior Neck Area
Start with your front shot. This is your hero image—the one most customers will see first in your eCommerce clothing photography listings.
- Frame straight and centered – A level camera ensures symmetry in the hollow man effect photography.
- Keep lighting consistent – Use your mannequin photography lighting setup to avoid color or shadow changes between shots.
- Capture the back view – This gives customers a complete visual and makes your product page feel more premium.
- Take an interior neck shot – This small detail is key. It helps you recreate the natural neckline in your Photoshop ghost mannequin tutorial, giving the garment a realistic 3D fill.
These three shots form the base structure of your invisible mannequin image.
Capturing Detail Shots for Added Realism
Details sell products. Product image quality is one of the most important factor in deciding to buy.
Zoom in on:
- Fabric texture and weave.
- Buttons, zippers, or embroidery.
- Special features like lining or stitching patterns.
Multiple Angle Shots for Versatility
Your customers want to see your products from every angle—just like they would in a store. Multiple shots also give you more flexibility when creating marketing materials.
- Side views – Show the profile and fit.
- Three-quarter views – Give depth and perspective.
- Any unique angle – Highlight features like asymmetric cuts or flowing hems.
When you have these in your archive, you can use them for product pages, social media, and ads without setting up another shoot.
Post-Processing and Editing
Once your shots are captured, post-processing is where ghost mannequin photography truly comes to life. This stage removes the mannequin, blends your images, and gives your product that clean, 3D hollow man effect photography shoppers love. A polished edit not only makes your store look premium but can also boost buyer confidence.
Importing and Layering Images in Photoshop
Open your images in Photoshop and start by importing the key shots—front, back, and any detail images like the interior neck.
- Place each shot on a separate layer.
- Name your layers clearly so you know which is which.
- Align the layers so they match up perfectly—this is crucial for seamless ghost mannequin editing.
Organized layers make the editing process faster and keep your Photoshop ghost mannequin tutorial workflow clean.
Removing Mannequin Parts While Keeping Garment Shape
This is where invisible mannequin photography gets its magic.
- Use the Pen Tool, Lasso Tool, or Quick Selection Tool to outline the garment.
- Create a mask to hide the mannequin without cutting into the garment edges.
- Pay special attention to tricky areas like collars and sleeves—these define the garment’s shape in eCommerce clothing photography.
Your goal is to keep every curve and fold intact so the garment looks naturally worn.
Blending Layers to Create the Hollow/3D Effect
Now combine your main garment shot with your interior neck or inside panel shot.
- Use layer masks to reveal just the parts of the inner shot that create depth.
- Match lighting and color tones so both layers look like one seamless image.
- Feather your mask edges slightly to avoid sharp, unrealistic lines.
This blending step is the essence of the hollow man effect photography—it turns flat product shots into dimensional, clickable images.
Adding Shadows for a Natural Look
A subtle shadow can make your image feel grounded and real.
- Create a new layer beneath your garment.
- Use a soft black brush at low opacity to paint shadows where natural folds or depth occur.
- Blur the shadow slightly for a softer, studio look.
This small step makes a big difference—it’s often the finishing touch that convinces customers your images are authentic and high quality.
Using Ghost Mannequin AI for Faster Processing
If you work with large catalogs, AI ghost mannequin removal tools can speed up editing dramatically.
- AI tools automatically detect and remove mannequins while preserving garment edges.
- They can pre-blend layers, leaving you to make final refinements.
- This approach works best when combined with clean shooting practices and consistent mannequin photography lighting setup.
The result? You maintain quality while cutting turnaround time—ideal for fast-moving eCommerce operations.
Cost and Outsourcing Options
Ghost mannequin photography can fit different budgets depending on how much of the process you handle yourself and how much you outsource. Some brands prefer to keep it all in-house for control, while others hire professionals or even purchase ready-to-use images. Understanding your options helps you balance cost, time, and quality.
Ghost Mannequin Photography Cost Factors
The cost of invisible mannequin photography varies based on a few main elements:
- Equipment investment – Cameras, lenses, lighting, and a suitable mannequin.
- Studio setup – Space rental or building your own mini studio.
- Post-production – Whether you do ghost mannequin editing yourself or pay for a ghost mannequin service.
- Volume of products – More items mean higher total cost, but usually a lower per-image rate when outsourced.
On average, professional hollow man effect photography can cost between $20–$80 per image, depending on complexity and detailing.. High-end fashion brands often spend more to maintain a consistent, luxury feel.
Hiring Professionals vs. DIY Editing
Hiring professionals means you get polished, ready-to-use images without touching Photoshop. You pay for their experience, advanced mannequin photography, lighting setup, and efficient workflow. This is ideal if you have a large catalog and want a quick turnaround without compromising quality.
DIY editing gives you full creative control. You can follow a Photoshop ghost mannequin tutorial, experiment with angles, and adjust every detail until it matches your vision. However, it demands time, editing skills, and a keen eye for invisible mannequin photo editing.
Ghost Mannequin Photography for Sale – Buying Pre-Made Shots
Some suppliers and wholesalers offer ghost mannequin photography for sale. These are pre-shot, edited images of standard products like plain T-shirts, jeans, or jackets.
- Pros – Instant availability, lower cost, no production time.
- Cons – Limited customization, may not perfectly match your brand style.
If you sell generic apparel, buying pre-made shots can be a cost-effective shortcut. But for unique designs or branded pieces, custom ghost mannequin photography will always create more impact and authenticity in eCommerce clothing photography.
Best Practices for High-Quality Ghost Mannequin Photography
Even with the right tools and editing skills, your ghost mannequin photography results depend on consistent, professional practices. These small but powerful habits make your images look polished, cohesive, and trustworthy—whether you’re shooting 10 products or a catalog of 1,000. Following these best practices also speeds up editing, reduces returns, and builds a strong brand presence in eCommerce clothing photography.
Keeping Garment Shapes Consistent Across Product Lines
Consistency is a silent brand builder. If one shirt appears neatly filled out while another looks flat, customers notice—and it affects perceived quality.
- Use the same mannequin size for similar products.
- Adjust garments with clips, padding, or tissue to maintain a natural drape.
- Align hems, collars, and sleeves identically for each shot.
This creates a cohesive look across your store and makes invisible mannequin photography edits faster.
Maintaining Color Accuracy
Color accuracy is critical in online retail—poorly represented colors lead to disappointed customers and higher returns.
- Use a color checker during your shoot to ensure precise tones.
- Keep your mannequin photography lighting setup the same for all images to avoid color shifts.
- Calibrate your monitor before editing to see true colors.
When your colors match the real product, you reduce costly returns and improve customer confidence—an essential apparel product photography tip.
Speed vs. Quality in Editing Workflows
Fast editing is tempting, especially for large product batches, but speed should never sacrifice quality.
- For high-volume work, integrate AI ghost mannequin removal to cut basic processing time.
- Always review AI edits manually to fix shadows, edges, or missed details.
- Follow a consistent Photoshop ghost mannequin tutorial workflow so every image meets your brand’s quality standards.
Balancing efficiency with precision ensures your hollow man effect photography looks professional while keeping production timelines realistic.
Common Mistakes and How to Avoid Them
Even skilled photographers can make small errors in ghost mannequin photography that lower image quality and slow down editing. The good news is these mistakes are easy to spot—and even easier to fix when you know what to look for. Avoiding them will make your invisible mannequin photography workflow faster, your edits smoother, and your final images far more professional.
Uneven Lighting Issues
Uneven lighting is one of the most common problems in eCommerce clothing photography. It creates unwanted shadows, alters fabric color, and makes ghost mannequin editing harder.
- Why it happens – Light sources are placed too close, too far, or at mismatched angles.
- How to fix it – Use a consistent mannequin photography lighting setup with soft, diffused light. Place lights at equal distances on both sides of the mannequin.
- Pro tip – Test shots before the full shoot help you spot shadows or glare instantly.
Misaligned Layers During Post-Editing
When combining shots in Photoshop, misaligned layers can ruin the hollow man effect photography look. The garment may appear distorted or unbalanced.
- Why it happens – Camera or mannequin movement between shots.
- How to fix it – Always use a tripod and mark the mannequin’s position on the floor. Keep the camera height and distance locked.
- Editing tip – In your Photoshop ghost mannequin tutorial workflow, align layers manually before masking to ensure perfect symmetry.
Over-Editing That Loses Fabric Texture
Heavy editing can make a product image look artificial, stripping away fabric details that shoppers rely on to judge quality. This is especially damaging in invisible mannequin photo editing where texture shows craftsmanship.
- Why it happens – Excessive use of blur, noise reduction, or cloning tools.
- How to fix it – Edit to enhance, not erase. Keep texture sharp, especially in close-up areas like collars, cuffs, and seams.
- Pro tip – Compare your edited image to the original garment under studio lighting to ensure accuracy.
Maintaining texture is essential for buyer confidence—shoppers want to feel they can “touch” the fabric through the screen.
Choosing the Best Ghost Mannequin App or Service
The right app or service can make ghost mannequin photography faster, more consistent, and more cost-effective. Whether you handle everything yourself or outsource the editing, your choice should align with your budget, product volume, and quality expectations. Picking the right solution saves hours of work while ensuring your images meet the professional standards of eCommerce clothing photography.
Features to Look for in a Ghost Mannequin App
Not all ghost mannequin apps are created equal. Look for features that help you achieve the hollow man effect photography without compromising quality:
- Automatic mannequin removal – Saves time on masking and cutting out images.
- Layer blending tools – Essential for combining front, back, and interior neck shots seamlessly.
- Batch processing – Handles large product catalogs quickly.
- Color accuracy controls – Maintains true-to-life garment colors.
- Integration options – Connect with editing tools or storage systems you already use.
An app that offers these features will streamline your invisible mannequin photo editing workflow while keeping your images brand-ready.
AI-Based vs. Manual Editing Services
AI ghost mannequin removal services are fast and scalable. They’re ideal for brands with hundreds of SKUs that need consistent results on a tight timeline. AI tools can remove mannequins, align layers, and blend edges in seconds.
However, manual ghost mannequin editing done by a professional service often delivers higher precision. Editors can handle tricky areas—like sheer fabrics or complex patterns—that AI might misinterpret.
The best approach for many businesses is a hybrid: use AI for bulk processing, then fine-tune key images manually. This ensures both efficiency and the high-quality finish expected in premium apparel product photography tips.
Integrating with Your eCommerce Platform
Your editing workflow should connect smoothly with your sales platform. A good ghost mannequin service or app should:
- Export in optimized formats for your store (JPEG, PNG, WebP).
- Support consistent sizing so product listings look uniform.
- Offer direct upload options to platforms like Shopify, WooCommerce, or BigCommerce.
When your editing process integrates directly with your eCommerce platform, you cut upload time, reduce formatting errors, and get your products live faster—critical in competitive online retail.
Conclusion – Bringing Your Products to Life Without the Mannequin
Ghost mannequin photography is more than a technique—it’s a way to showcase your products with clarity, style, and professionalism. By combining smart preparation, precise shooting, and skilled ghost mannequin editing, you create images that highlight fit, texture, and detail without distractions. Whether you choose DIY editing, AI tools, or a ghost mannequin service, the goal is the same—deliver visuals that convert browsers into buyers. Consistency, color accuracy, and attention to detail make your catalog stand out in competitive eCommerce clothing photography. With the right approach, every image tells a story and brings your products to life.
Start your dropshipping business today
FAQs on Ghost Mannequin Photography
How much does ghost mannequin photography cost?
The cost of ghost mannequin photography typically ranges from $20–$80 per image, depending on garment complexity, editing requirements, and whether you hire a professional service or do it in-house.
What is ghost mannequin photography?
Ghost mannequin photography is a product photography technique where garments are photographed on a mannequin and later edited to remove the mannequin, creating a 3D, hollow effect that shows the natural shape and fit.
How to create a ghost mannequin image?
To create a ghost mannequin image, photograph the garment from the front, back, and inside neck on a mannequin. Then, use ghost mannequin editing in Photoshop or AI tools to remove the mannequin and blend the images seamlessly.
What is the difference between flat lay and ghost mannequin?
Flat lay photography shows garments laid flat on a surface, giving a 2D view. Ghost mannequin photography uses the hollow man effect to display the garment as if worn, providing a more realistic 3D look for online shoppers.


Launch your dropshipping business now!
Start free trial


Related blogs

Top WordPress eCommerce Themes for 2026
Explore the best WordPress eCommerce themes for 2026. Compare WooCommerce themes by speed, design, features, and dropshipping potential.


Saba Mohebpour Didn't Stop at Spocket: His New $50M Fund, ILA Capital, Is Buying Up Shopify and Amazon Apps
After building Spocket into a major ecommerce platform, Saba Mohebpour is launching ILA Capital with a $50M strategy to acquire Shopify and Amazon apps powering modern ecommerce.


Top Trendsi Alternatives for Fashion Dropshipping
Explore the best Trendsi alternatives for fashion dropshipping, fast shipping, branding, Shopify integration, and reliable suppliers.