How to Remove Background in Photoshop
Learn how to remove background in Photoshop using tools like Quick Selection, Remove Background, and more. Easy, fast, and beginner-friendly guide!

.avif)

Want to make your photos stand out with clean, professional-looking edits? Removing the background in Photoshop is one of the easiest ways to do that — and you don’t need to be a design expert. Whether you're creating product images, profile pictures, or social media content, knowing how to remove background in Photoshop can save you hours and elevate your work.
In fact, background removal is one of the most in-demand photo editing tasks today, especially in ecommerce and marketing. Ready to learn the easiest and fastest ways to remove backgrounds like a pro — even if you're a beginner? Let’s jump in.
Why Remove Backgrounds in Photoshop?
Removing backgrounds isn’t just a fancy design trick. It’s a powerful way to focus attention, clean up visuals, and give your images a polished, professional look. Photoshop makes this task easy, whether you're creating a product photo, a digital portrait, or a marketing graphic. If you're serious about your visuals, learning how to remove background in Photoshop is a must-have skill.
Let’s break down the common uses and real benefits.
Common Use Cases: Ecommerce, Design, Portraits
Photoshop is widely used across industries because clean images sell better.
- Ecommerce: Online stores often remove backgrounds to make products pop. Product pages with clean, isolated images can boost conversions.
- Graphic Design: Designers often need transparent background assets for flyers, thumbnails, banners, and websites. A cut-out image fits perfectly into any creative layout without clashing with colors or patterns.
- Portraits and Social Media: Creators and photographers use Photoshop to remove distractions from backgrounds, highlight the subject, or even switch out environments entirely.
With just a few clicks, you can transform an ordinary photo into a scroll-stopping visual.
Benefits of Using Photoshop for Background Removal
Photoshop offers flexibility, speed, and precision — all in one place.
- You get multiple options like the Quick Selection Tool, background eraser tool, and one-click background removal to suit different images.
- It allows you to export a transparent backgound Photoshop file (like PNG) instantly.
- You can use Photoshop background remover shortcuts to streamline your workflow.
- You can easily cut out background in Photoshop without losing image quality.
- Its refined edges feature helps you clean up hair, edges, or tricky outlines with precision.
- Photoshop supports non-destructive editing, meaning your original image stays safe while you work on a Photoshop remove background layer.
If you're looking to remove background in Photoshop for free as a beginner, the tools are already built-in — you just need to know how to use them. The more you explore, the faster you’ll find your go-to method.
Getting Started with Photoshop
Before you dive into background removal, you need to set up your image correctly in Photoshop. A well-prepared file makes editing smoother and faster. Whether you're using a scanned drawing, a product shot, or a selfie — it all starts with knowing the basics. This section walks you through the essential first steps before you remove background in Photoshop.
How to Open and Prepare Your Image
Start Photoshop and go to File > Open. Choose the image you want to edit.
If the image opens with a locked “Background” layer, double-click it to unlock and rename it. This small action gives you full control. Without unlocking the layer, you can’t apply many essential edits like masks or transparency.
Pro Tip: Always duplicate the original layer first. Just press Ctrl + J. This keeps your source safe in case you make a mistake.
Turn Art or Photos into Editable Digital Files
If you’ve scanned a drawing or imported a photo from your phone, check the resolution. Go to Image > Image Size and make sure it’s set to at least 300 dpi for high-quality output.
For web use, 72 dpi works, but for print or product visuals, 300 dpi is ideal. You can also convert raster layers into Smart Objects if you plan to scale or apply filters. This keeps the quality intact while editing.
Understanding Layers and Non-Destructive Editing
Photoshop works on layers — think of them like transparent sheets stacked on each other. When you remove the background, you're essentially working on one of those sheets.
Always use layer masks instead of erasing pixels directly. This technique lets you cut out background in Photoshop without deleting any part of the image permanently.
Also, name your layers clearly. It saves time when you're handling multiple elements in a complex project.
Need to remove a background layer? Right-click the background in the Layers Panel, select Delete Layer, or hide it and export the final image with a transparent background in Photoshop.
Using non-destructive methods gives you flexibility. You can always go back and tweak your edits without starting over.
Top Methods to Remove Background in Photoshop
Photoshop offers several tools to remove backgrounds. Each has its strengths, depending on your image type and desired result. Whether you're after a fast one-click fix or a more refined cut-out, you’ll find the right tool below. Let’s go over the top methods to remove background in Photoshop — step by step.
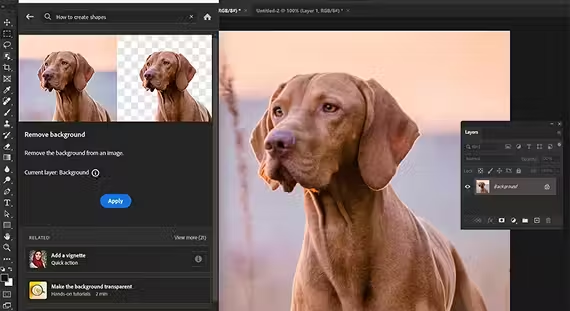
1. Remove Background Tool (One-Click Method)
This is by far the easiest and fastest method. It uses Adobe Sensei AI to detect and isolate the subject in one click. You don’t need to trace or select anything manually — Photoshop handles it all.
How to Use the Remove Background Tool in One Click
- Open your image.
- Unlock the background layer.
- Go to the Properties panel.
- Click on “Remove Background.”
That’s it. The tool will automatically create a mask and cut out the background.
Best Use Cases for This Tool
- Product photos on plain backgrounds
- Social media posts
- Headshots with simple contrast
- Quick batch edits for ecommerce
This method is perfect if you need fast, one-click background removal in Photoshop. However, it may not capture fine details like hair or soft edges. For that, you'll need more control.
2. Quick Selection Tool
This tool gives you manual control with fast selection. It detects edges based on contrast and lets you brush over the subject quickly.
Step-by-Step: How to Remove Background with Quick Selection
- Press W to select the Quick Selection Tool.
- Click and drag over your subject to select it.
- Click Select and Mask (on the top bar).
- Adjust sliders like Smooth, Feather, or Contrast.
- Choose Output To: Layer Mask and click OK.
This method helps you cut out background in Photoshop without deleting any pixels — everything stays editable.
Refining the Selection for a Cleaner Cut
After masking, use the Refine Edge Brush Tool inside the Select and Mask workspace. This is crucial for tricky areas like hair, fur, or fabric edges.
Pro Tip: Zoom in at 200% when working around small details. Lower the brush size for precision. This gives your cutout a more professional look and avoids harsh edges.
3. Magic Wand Tool
Ideal for high-contrast or solid-color backgrounds, this tool selects pixels of similar color instantly.
How to Use Magic Wand for Background Removal
- Select the Magic Wand Tool (shortcut: W, hold Shift if needed).
- Click on the background area.
- Hit Delete or apply a mask for non-destructive edits.
This is great if you want to remove white background in Photoshop or isolate graphics with flat colors.
Adjusting Tolerance and Feathering
The Tolerance setting determines how much color variation gets selected. Lower values (10–30) mean more precise selections. Higher values (50–100) select a broader range.
You can also feather the edges slightly (1–2px) to avoid jagged cutouts.
Use this tool for
- Logos on white backgrounds
- Scanned drawings
- Flat illustrations
4. Background Eraser Tool
If you're dealing with complex backgrounds or fine details like fur, flyaways, or textured edges, the Background Eraser Tool in Photoshop gives you hands-on control. Unlike one-click options, this method lets you brush over and delete background pixels manually — which can be surprisingly satisfying.
Using the Eraser Tool to Manually Delete Backgrounds
- Select the Background Eraser Tool from the left toolbar (or press E, then Shift+E to toggle).
- Choose a soft round brush from the top options bar.
- Set Sampling: Continuous, Limits: Contiguous, and adjust Tolerance (start around 25%).
Now, move the brush over the background area. Photoshop samples the pixels under the crosshair and erases similar ones.
This method is ideal when the subject and background have contrasting colors, but parts of the background still peek through in automated selections.
Tips for Precision and Clean Edges
- Zoom in when working around hair or object edges.
- Lower Tolerance for more precision. Higher values delete more aggressively.
- Switch to Discontiguous mode if your background is fragmented.
Pro Tip: Use a layer mask if you want a non-destructive workflow. Duplicate the layer before you start — just in case you want to revert changes.
This tool takes time but helps you achieve razor-sharp, clean cutouts.
5. Select and Mask for Detailed Subjects
The Select and Mask workspace is where the real magic happens, especially when working with detailed selections like hair, fur, or sheer fabric. If you want to refine edges in Photoshop like a pro, this is your go-to toolset.
How to Refine Hair and Complex Edges
- Make a rough selection using the Quick Selection Tool or Lasso Tool.
- Click Select > Select and Mask (or click the button on top bar).
- In the workspace, use the Refine Edge Brush Tool on hair or textured edges.
- Adjust the Radius, Smooth, Feather, and Contrast sliders for better blending.
- Set Output To: New Layer with Layer Mask for best results.
Adobe’s AI does a good job here, especially with hair and fine strands. This is where Photoshop really beats free background removers.
Black and White Brushes: Reveal or Conceal Technique
Inside the Select and Mask panel, or after masking your subject, you can manually edit the mask using the Brush Tool (B):
- Use a white brush to reveal parts of the image.
- Use a black brush to conceal or hide unwanted areas.
This method gives pixel-perfect control over your edges. It’s especially useful when the auto-selection tools leave tiny artifacts or semi-transparent zones. Combine this with zooming and feathering for ultra-smooth blends.
How to Remove White Background in Photoshop
White backgrounds are common in product photography, scanned documents, and logos. They’re clean but sometimes too limiting when you're trying to design or layer visuals. Luckily, Photoshop offers two simple ways to remove white background in Photoshop while keeping the subject intact.
Let’s look at the tools and how to preserve transparency without losing quality.
Magic Wand vs. Select Color Range
The Magic Wand Tool is quick and easy for solid white backgrounds. It selects pixels with similar colors in one click.
Steps to use Magic Wand
- Press W to activate the tool.
- Click on the white area.
- Adjust Tolerance (start with 25).
- Hit Delete or apply a layer mask.
But if your image has shades of white or soft shadows, use Select > Color Range instead.
Steps to use Select Color Range
- Go to Select > Color Range.
- Click on the white area in the preview.
- Adjust Fuzziness to fine-tune the selection.
- Click OK, then delete or mask.
Use Magic Wand for clean edges. Use Color Range for images with gradients or lighting variations.
Preserving Transparency and Quality
Once the background is removed, save your file in a format that supports transparency.
- Go to File > Export > Export As.
- Choose PNG and check the Transparency box.
Never save it as JPG — it doesn’t support transparent backgrounds and can reduce quality. Also, keep your Photoshop remove background layer intact in case you need to go back and make changes.
Pro Tip: For best web performance, use PNG-24 to retain both transparency and quality.
Photoshop Shortcuts for Faster Background Removal
Speed matters — especially when you’re editing multiple images. Mastering shortcuts helps you remove background in Photoshop faster and more efficiently.
Keyboard Shortcuts to Speed Up Your Workflow
Here are the most helpful shortcuts:
Using these can shave minutes off every project — especially if you’re working with ecommerce or batch image processing.
Custom Actions and Presets
If you use the same steps frequently, automate them.
- Go to Window > Actions.
- Click the + icon to record a new action.
- Perform your steps: open file, unlock layer, remove background, export.
- Stop recording and assign a shortcut.
Next time, just hit the shortcut and Photoshop repeats everything. You can even apply these actions to multiple files with File > Automate > Batch. It’s a game changer when working on 10, 100, or even 1,000 images.
Make Your Background Transparent
After you remove the background in Photoshop, your next step is saving it the right way. If your image ends up with a white background again, it’s probably because it was exported in the wrong format. Let’s fix that.
Exporting Images with Transparent Background
To keep your background transparent:
- Make sure the background is actually removed or hidden.
- Go to File > Export > Export As.
- Choose PNG as the file format.
- Tick the Transparency checkbox.
- Click Export to save.
You can now use this image in designs, websites, or presentations without a white box ruining the look. This is the final step in the process to create a clean transparent background in Photoshop.
Tip: If you’re seeing a white background, double-check your layer — it might be locked or not removed correctly.
Best File Formats: PNG vs. PSD
Choosing the right format matters:
- PNG: Perfect for web, ecommerce, and social media. It supports transparency and keeps file size manageable.
- PSD: Photoshop’s native format. Best for future edits, especially if you want to keep your Photoshop remove background layer and masks intact.
Use PNG when you're done editing. Use PSD when you're still working on it or sharing with teammates.
Bonus: Use AI & Descriptive Prompts to Remove Backgrounds Faster
Photoshop is evolving fast, and AI tools are leading the way. Adobe’s AI can now help you not just remove backgrounds — but also replace or generate them based on your prompts.
Photoshop Generative Fill & AI Background Removal Tools
With the Generative Fill feature in Photoshop (Beta), you can remove and regenerate backgrounds using smart AI.
Here’s how:
- Make a selection around the background area.
- Click Generative Fill from the Contextual Task Bar.
- Leave the prompt blank (to remove only), or enter a new background description.
- Let Adobe Firefly do the work.
It creates a high-quality, natural-looking result using AI — especially helpful when you need to change environments or edit fast.
Use Text Prompts to Create or Replace Backgrounds
Want your product photo on a beach or in a modern kitchen? You don’t need a photoshoot — just type it.
For example:
- Type “minimal white studio background” or “sunset cityscape.”
- Photoshop will generate and blend the new background automatically.
This is especially useful if you’re creating content at scale and need variety. It works well with ecommerce, social media, and creative portfolios.
It’s not just fast — it’s creative, scalable, and game-changing for visual storytellers.
Conclusion: Mastering Background Removal in Photoshop
Removing backgrounds in Photoshop doesn’t have to feel overwhelming. With tools like one-click removal, the background eraser, and AI-powered features, you can create clean, professional images in minutes. Whether you want to remove white backgrounds, cut out complex subjects, or export transparent PNGs — Photoshop gives you full control. By learning the right methods and shortcuts, you save time and improve quality. Start with the basics, explore advanced tools, and use AI to speed things up. Once you get the hang of it, background removal becomes fast, flexible, and fun. Your visuals will thank you.
Start your dropshipping business today
FAQs on Removing Background in Photoshop
How do you remove a background in Photoshop?
Use tools like Remove Background, Quick Selection, or Magic Wand to isolate the subject, then delete or mask the background layer.
How do I make my Photoshop background transparent?
After removing the background, export the image as a PNG and check the Transparency box in the export settings.
How to Remove Background with a selection tool in Photoshop?
Select the subject using the Quick Selection Tool, go to Select and Mask, refine the edges, and apply a layer mask to hide the background.
How do I remove the background from multiple images in Photoshop?
Use Actions to record your background removal steps, then apply them to a batch of images using File > Automate > Batch.
Is there a shortcut for background removal in Photoshop?
There’s no default one-click shortcut, but you can assign one for Remove Background through Edit > Keyboard Shortcuts.
How do I remove a white background in Photoshop?
Use the Magic Wand Tool or Select > Color Range, click the white area, and delete or mask it to remove white background cleanly.
Can I use Photoshop to make a transparent background?
Yes. Remove the background, then export your image as a PNG with transparency enabled to keep the background clear.


Launch your dropshipping business now!
Start free trial


Related blogs

Top WordPress eCommerce Themes for 2026
Explore the best WordPress eCommerce themes for 2026. Compare WooCommerce themes by speed, design, features, and dropshipping potential.


Saba Mohebpour Didn't Stop at Spocket: His New $50M Fund, ILA Capital, Is Buying Up Shopify and Amazon Apps
After building Spocket into a major ecommerce platform, Saba Mohebpour is launching ILA Capital with a $50M strategy to acquire Shopify and Amazon apps powering modern ecommerce.


Top Trendsi Alternatives for Fashion Dropshipping
Explore the best Trendsi alternatives for fashion dropshipping, fast shipping, branding, Shopify integration, and reliable suppliers.