How To Cancel Your Shopify Subscription
Learn how to cancel your Shopify subscription, close your store, and manage your data with our easy step-by-step guide.
.avif)

Are you considering leaving Shopify for another eCommerce platform, or have you experienced a decline in sales? Canceling your Shopify store might seem like a big step, but it doesn’t have to be difficult. This guide will walk you through every necessary step, from deciding when to cancel to exploring alternative eCommerce platforms for your business. Let’s dive in.
Before you dive into the cancellation process, it's important to consider if canceling is the right decision for your business. There are several reasons why Shopify store owners may choose to close their accounts. Let’s break down some of the most common reasons!
7 Reasons to Cancel Shopify Subscription
If you're considering canceling your Shopify subscription, it's important to weigh the reasons behind your decision. Whether it's due to financial concerns, a shift in business needs, or a desire for more customization, understanding why you want to cancel can help you make the best choice for your business. Here are 7 reasons why store owners might decide to cancel their Shopify subscription and explore alternative solutions.
1. Drop in Sales
If your online store isn’t generating the sales you expected, despite trying various marketing strategies and improving your product listings, it may be time to reconsider. A drop in sales could signal that Shopify isn’t meeting your business’s needs, or perhaps your target market is shifting elsewhere.
2. Platform Swap
As your business grows, your needs may evolve. If you find that Shopify no longer offers the features you require, or you feel another platform would be a better fit, it might be time to explore alternatives. This could include platforms with advanced customization or more cost-effective transaction fees.
3. Taking a Break
Sometimes, eCommerce businesses need a pause. Whether you're taking time off for personal reasons or focusing on a different project, Shopify allows you to pause your store for up to 90 days. This can be an ideal solution if you want to take a break without permanently shutting down your business.
4. Selling Your Store
Have you built a profitable and successful Shopify store but no longer want to manage it? Shopify’s Exchange Marketplace allows you to sell your business to interested buyers. This option can be highly rewarding if your store is well-established and you’re ready to profit from its success.
5. Limited Customization
For some store owners, Shopify’s customization options can feel restrictive. While Shopify offers themes and apps to enhance store design, it may not provide the full flexibility you desire. If you're looking for more control over your store’s appearance and functionality, this may be a valid reason to cancel your subscription.
6. High Transaction Costs
Shopify charges transaction fees on sales, especially for users not using Shopify Payments. These costs can add up quickly and eat into your profits, making it more expensive to run your business. If you’re looking for a more cost-effective solution, other platforms may offer lower fees.
7. Migration Challenges
Moving your store to a different platform can be difficult and time-consuming. Shopify’s hosted solution means your data is tied to Shopify’s servers, which makes migration a complex and lengthy process. However, if the benefits of another platform outweigh the challenges, migrating may be worth it in the long run.
Considerations Before You Cancel Your Shopify Account
If you’ve decided that canceling your Shopify subscription is the right choice, it’s important to take a few steps before proceeding. These actions will help you avoid any unwanted issues in the future.
1. Backup Your Data and Information
Before canceling your Shopify account, ensure that all the data you want to keep is safely backed up. Shopify doesn’t allow you to reuse your myShopify.com domain for a new store, so make sure you export important data like product information, orders, and customer details.
- Export CSV Files: Download all your store’s data (including products, orders, and customers) to CSV files. This ensures you can refer to it later if needed.
- Download Your Theme Backup: If you’ve purchased a theme, download it for safekeeping. Themes are licensed to a specific store, but you can contact Shopify Support to transfer the license to a new store if necessary.
2. Resolve Unpaid Bills
Before canceling your subscription, make sure all outstanding bills are paid. Unresolved payments could result in issues down the road, especially if you decide to open a new store in the future.
3. Cancel Third-Party Applications
Shopify allows users to integrate third-party apps to enhance store functionality. However, these apps may continue to charge you even after you cancel your store. Ensure that you cancel any active subscriptions to third-party services to avoid unwanted charges. Additionally, review your contracts and legal obligations to understand termination clauses and avoid potential breaches.
4. Manage Unfulfilled Orders
If you have orders that haven’t been fulfilled, it’s crucial to settle them before canceling your store. Keep track of the customer data, especially if the order is in progress, to avoid disputes or unhappy customers.
5. Effect on Custom Domains
If you bought a custom domain through Shopify, make sure to disable auto-renewal and transfer it to another domain provider before canceling your account. If you don’t do this, you may lose access to the domain after closing your store.
Step-by-Step Guide to Cancel Your Shopify Subscription
Once you’ve considered all the necessary steps, it’s time to proceed with canceling your Shopify subscription. Here’s a step-by-step guide to help you through the process:
Step 1: Access Your Shopify Admin Panel
Log into your Shopify account. Click on the store name dropdown in the upper left corner and select "Dashboard" to access your admin panel.
Step 2: Choose Your Subscription Option
Go to Settings > Plan. Choose "Manage Plan" to view your current subscription details. You can then decide whether you want to pause or cancel your subscription.
Note: Canceling your subscription will delete your store permanently. If you want to take a break, consider pausing your store instead.
Step 3: Decide Whether to Delete or Sell Your Store
Before proceeding with the deletion, consider whether you want to sell your store. Shopify’s Exchange Marketplace is a great platform to list your business for sale. If you’re not interested in selling, you can proceed with canceling your store.
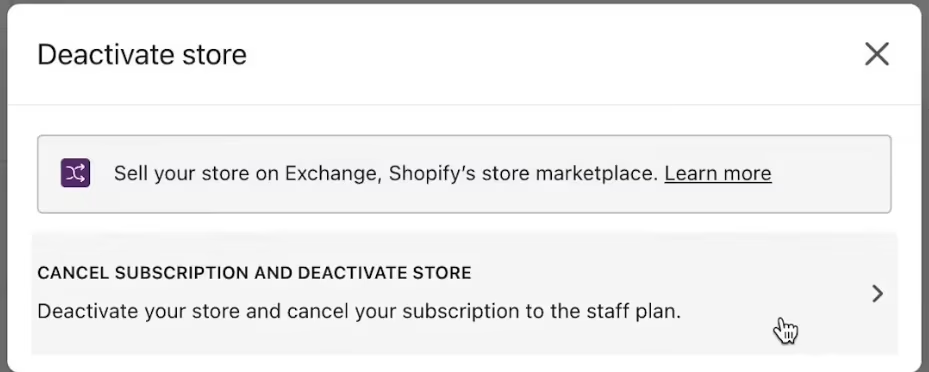
Step 4: Cancel Your Subscription
Click on "Cancel Subscription and Close Store". If you’re sure about closing your store, this will begin the cancellation process.
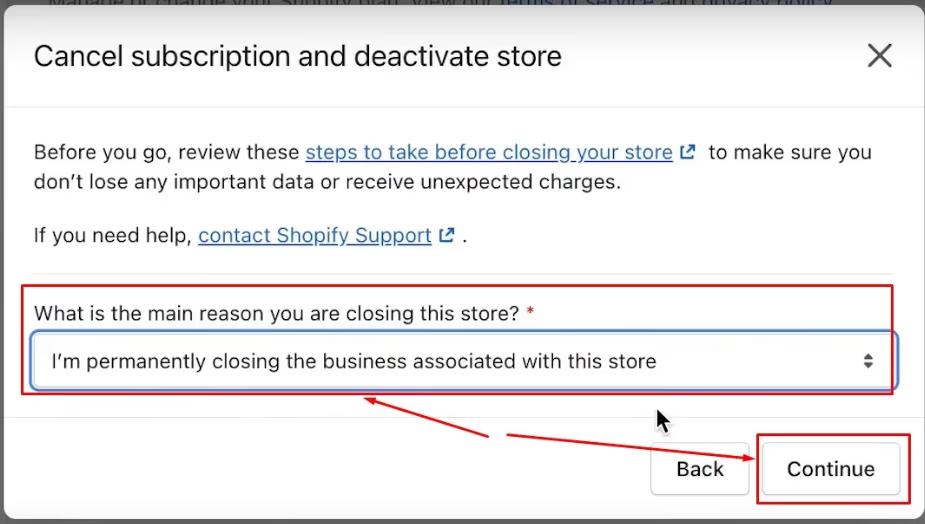
Step 5: Select Your Cancellation Reason
Shopify will ask you to choose a reason for canceling your subscription from a dropdown list. Choose the reason that best matches your situation and click "Continue".
Step 6: Confirm Deletion
Review the details of your cancellation, as this action is permanent. Once you’re sure, click "Cancel Subscription and Close Store" to finalize the process.

Delete Your Shopify Store Using Specific Device
Although a general, detailed, step-by-step method to delete your Shopify store using a specific device
Delete Your Shopify Store Using Desktop
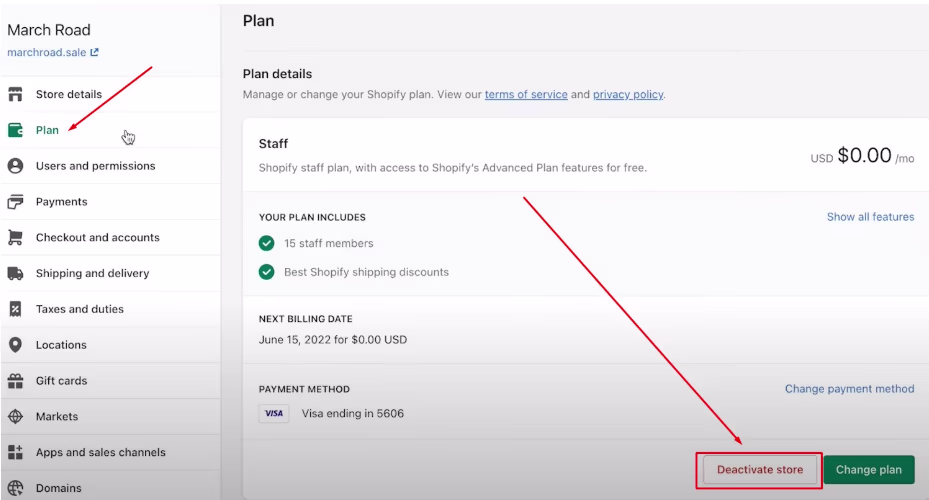
- Go to Settings > Plan in your Shopify admin.
- To deactivate the store, click.
- Review your options to establish a new store or move to the Pause and Build plan, if appropriate.
- Click Deactivate Store if you still wish to deactivate.
- Decide why the account was deactivated.
- Not required: If it's possible, include a comment to provide further details.
- Press the next button.
- After entering your password, select "Deactivate Store."
Delete Your Shopify Using an iPhone
- As the store owner, log into the Shopify app.
- Press... > Settings.
- Select Plan.
- Select "Deactivate store."
- Decide why the account was deactivated.
- Not required: If it's possible, include a comment to provide further details.
- Select Save.
- After entering your password, select Save.
Delete Your Shopify Store Using Android
- As the store owner, log into the Shopify app.
- Press ☰ > Settings.
- Select Plan.
- Select "Deactivate store."
- Decide why the account was deactivated.
- Not required: If it's possible, include a comment to provide further details.
- Press ✓.
- After entering your password, hit ✓.
Completely Erase your data
If you choose to reopen your store, the information about it is guaranteed for two years. You may, however, ask for the personal data concerning your store's patrons to be removed prior to that period.
Find out more about data deletion.
Can You Pause Your Shopify Account Instead of Canceling?
If you're not quite ready to delete your Shopify store permanently but still need a break from running your business, Shopify offers a helpful Pause option. This allows you to temporarily suspend your store's activities without completely closing it down. This feature is ideal if you need time to focus on other aspects of your business or life without losing access to your store’s data.
Pause Your Store
To pause your store:
- Go to Settings: In your Shopify Admin panel, navigate to Settings.
- Select Plan: Click on the "Plan" option.
- Choose Pause: You’ll see an option to "Pause" your store. By choosing this option, you can stop selling on your store temporarily.
The Pause option lets you suspend your store for up to 90 days. During this pause:
- You won’t be charged the full monthly fee, which helps reduce costs during downtime.
- Your customers won’t be able to make purchases, but you’ll still have access to your store data, including product listings, orders, and customer details.
This option is perfect if you’re not ready to permanently close your store, want to take a break, or need time to focus on other tasks.
Reopen Your Store
Once the pause period is over, you can easily reactivate your store. All you need to do is:
- Choose a new plan (depending on your business needs) from the available options in your Shopify account.
- After selecting a plan, you can reactivate your store and continue operations just like before.
This allows you to "take a breather" and come back without losing any important store data or needing to rebuild your business from scratch.
Options to Shopify Alternatives After Cancellation
If you’ve decided to cancel your Shopify store, you may be considering other eCommerce platforms to move your business to. There are several strong alternatives to Shopify, depending on your needs. Let’s explore three of the most popular options:
1. WooCommerce
If you are already using WordPress for your website, WooCommerce is one of the best alternatives to Shopify. It’s an open-source plugin that turns your WordPress site into a fully functional online store.
Why WooCommerce?
- Highly Customizable: WooCommerce is incredibly flexible. You can customize your store’s functionality and appearance with thousands of plugins and themes.
- Free to Use: The basic WooCommerce plugin is free, making it an affordable option for those just starting out. However, additional features may require paid plugins or extensions.
- Seamless Integration with WordPress: If you're already familiar with WordPress, WooCommerce integrates easily with your existing site.
What to Consider
- Technical Knowledge: Unlike Shopify, WooCommerce requires some technical knowledge to set up and manage. You’ll need to handle your own hosting, security, and maintenance, which might be a bit more work than Shopify’s all-in-one solution.
- Requires Hosting: WooCommerce doesn’t provide hosting, so you will need to find and set up a hosting provider, which can incur additional costs.
2. Wix

Wix is a popular website builder that also offers eCommerce functionality. Known for its simplicity and ease of use, Wix allows even non-technical users to build an online store.
Why Wix?
- User-Friendly: Wix uses a drag-and-drop interface, making it easy to design your store without any coding skills.
- Beginner-Friendly: If you're new to eCommerce, Wix is a great choice because it’s extremely intuitive, with many templates to choose from.
- Affordable: Wix offers a low-cost plan for businesses just starting out.
What to Consider
- Limited Scalability: While Wix is excellent for small businesses, it may not scale as well as Shopify if your store grows rapidly. It lacks some of the advanced features and integrations that Shopify offers.
- Fewer eCommerce Features: While Wix has eCommerce functionality, it’s not as comprehensive as Shopify’s. You may find some limitations as your business expands.
3. BigCommerce

BigCommerce is a robust eCommerce platform, often considered one of Shopify’s top competitors. It’s particularly suitable for businesses with high-volume sales or those planning for rapid growth.
Why BigCommerce?
- Powerful Features: BigCommerce offers advanced eCommerce tools like built-in SEO, marketing, and analytics features to help you grow your online business.
- No Transaction Fees: Unlike Shopify, BigCommerce doesn’t charge transaction fees, which can be a big benefit if you process many sales.
- Scalable: BigCommerce is built for growth. It can handle high-traffic stores with large inventories, making it ideal for larger businesses.
What to Consider
- Cost: BigCommerce can be more expensive than Shopify, especially if you're just starting out. It offers tiered pricing based on your sales volume, so if you’re a smaller business, the costs might be higher than expected.
- Complexity: While BigCommerce has a lot of advanced features, the platform can be more complex to use compared to Shopify’s user-friendly interface.
How to Reactivate Your Shopify Store After Cancellation
If you’ve canceled your Shopify store but have since decided you want to reactivate it, you can easily do so by following a few simple steps. Whether you paused your store for a while or you’re re-entering the eCommerce space after a break, Shopify allows you to reopen your store and continue selling with minimal effort.
Here's a comprehensive step-by-step guide on how to reactivate your Shopify store after cancellation:
Step 1: Log Into Your Shopify Admin Panel
First, you need to log into your Shopify account. Go to Shopify's login page and enter your email and password to access your account. If you've forgotten your login credentials, you can use the Forgot your password? link to reset it.
Step 2: Choose the Store You Want to Reactivate
Once logged in, if you have more than one Shopify store, you’ll need to select the correct one from the store name dropdown menu in the top left corner of the admin panel.
- If you had multiple stores linked to your account, make sure you’re on the store that was previously canceled or paused.
Step 3: Go to Your Shopify Admin Settings
Once you’re in the correct store, navigate to the Settings section of your Shopify Admin panel.
- Click on Settings in the bottom left corner of the dashboard.
Step 4: Select “Plan” from Settings
Within the Settings menu, click on the "Plan" option. This section displays your subscription details, including the plans you can choose from to reactivate your store.
Step 5: Choose Your Plan
Here’s where you’ll need to decide which Shopify plan fits your current needs. If you’re just restarting your store, you can choose from various Shopify plans based on your budget and requirements. These include:
- Basic Shopify: Best for small businesses with minimal needs.
- Shopify Grow: The standard plan with more features for growing businesses.
- Advanced Shopify: For businesses looking for advanced reporting and features.
- Shopify Plus: A high-end option for large-scale operations with extensive customization.
Note: If you had previously paused your store, you might be able to choose the Pause and Build plan if you want to resume the store with reduced fees.
Step 6: Enter Payment Information
After selecting your plan, Shopify will ask you to enter your payment details (credit card information). You’ll need to complete this step to restart your store, even if you were previously paying for a subscription.
Tip: Ensure that your payment information is up to date. If your previous subscription was canceled due to a payment issue, it’s important to verify everything is current.
Step 7: Confirm Your Subscription and Reactivate
After entering your payment details, Shopify will show a review screen with all the information about your plan and billing cycle. Double-check the plan, payment information, and any other details provided.
Once you’re confident that everything is accurate, click "Subscribe" to confirm your plan selection and reactivate your Shopify store.
Step 8: Set Up Your Store (If Necessary)
If you’ve been away from your store for a while or if it was temporarily paused, you may need to do a little housekeeping. This includes:
- Reviewing your products: Check that your inventory and product listings are up to date. Ensure that all products are still available and priced correctly.
- Updating the design: If you’ve made changes to your store or theme since deactivating, you may want to review your design or update any pages.
- Checking for apps: Any third-party apps that you had installed might need reconfiguration after reactivating your store.
Once your store is reactivated and you’ve ensured everything is in place, you’re ready to start selling again!
Step 9: Start Selling Again
With your store reactivated, you can start accepting orders again, market your products, and resume your business as normal.
- Market your store: If you’ve been inactive for some time, it’s a good idea to refresh your marketing campaigns, whether through paid ads, email marketing, or social media promotions.
- Customer Engagement: Reach out to your previous customers via email or through social media to let them know your store is back up and running.
What Happens After Reactivating Your Shopify Store?
Once your Shopify store is reactivated, it will return to its original status as it was before cancellation. You’ll have access to all your previous data, such as:
- Order history
- Customer information
- Products and inventory
- Themes and customizations
- Sales reports
It’s important to note that if your store was fully deleted, you won’t be able to recover any of the data (products, orders, customers, etc.). However, if it was paused, you should have access to everything as it was before.
Conclusion
Canceling your Shopify subscription is a straightforward process, but it’s important to carefully consider the steps involved before making the decision. Whether you're pausing your store for a break, moving to a different platform, or closing your business altogether, Shopify provides options to manage your store’s status.
Be sure to back up your data, resolve any outstanding payments, and understand the implications of canceling or deleting your store. If you decide to reactivate in the future, you can easily get back on track with the necessary steps. Whatever your reason for canceling, make sure it aligns with your long-term business goals.
Start your dropshipping business today
FAQs about Shopify Subscription
Can I cancel my Shopify subscription at any time?
Yes, you can cancel your Shopify subscription at any time. However, Shopify does not offer refunds for unused time if you cancel before your billing cycle ends. You will still have access to your store until the end of the current billing period.
What happens when I cancel my Shopify subscription?
When you cancel your Shopify subscription, your store will be deactivated, and you will no longer have access to the admin panel. You won’t be able to process new orders, and your store will no longer be visible to customers. However, if you cancel your subscription, your data is retained for 30 days, allowing you to reopen your store if you change your mind.
Can I pause my Shopify subscription instead of canceling it?
Yes, Shopify allows you to pause your store for up to 90 days. During this pause period, you won’t incur full fees, but your customers won’t be able to make purchases. This is a great option if you need a break but want to keep your store's data and access for the future.
Will I lose my data if I cancel my Shopify subscription?
If you cancel your Shopify subscription but choose to pause your store, you won’t lose any data. All your products, orders, and customer information will be saved. However, if you permanently delete your store, you will lose all your data, and you will not be able to recover it once the store is deleted.
Can I Reactivate My Shopify Store After a Long Period of Time?
Yes, you can reactivate your Shopify store even after a long period of time, as long as the store was paused rather than fully deleted. If your store was completely deleted, you would need to start a new account and set up a new store.


Launch your dropshipping business now!
Start free trial


Related blogs
How to Import Your First Product from Spocket to Shopify
Learn how to connect Spocket with Shopify and import your first dropshipping product step by step, from product selection to pushing it live on your store.

Best Shopify Apps for New Stores Ranked by ROI
Start your Shopify store with high-impact apps that help you source products, win customer trust, recover sales, boost order value, and grow faster.
Complete Shopify Dropshipping Checklist: Free Template for Launching Your Store
Use this Shopify dropshipping checklist to launch your store with the right products, suppliers, pages, apps, SEO, payments, and marketing plan.