How to Turn Off Private Browsing on iPad
Learn how to turn off private browsing on your iPad and restore access to your browsing history, passwords, and cookies with this comprehensive, easy-to-follow guide.
.avif)

Private browsing is a great feature for those who want to browse the internet without leaving traces behind. When enabled, it prevents Safari from saving your browsing history, cookies, or search data. While this can be useful for privacy, there are instances when you may want to turn off private browsing on your iPad. Whether it’s to use your browsing history, save your passwords, or allow cookies for a better user experience, it’s important to know how to manage these settings.
In this detailed guide, we'll walk you through the steps to turn off private browsing on your iPad. We’ll also discuss the benefits of private browsing, why you might want to disable it, and how to manage your privacy settings for optimal browsing control.
What Is Private Browsing on iPad?
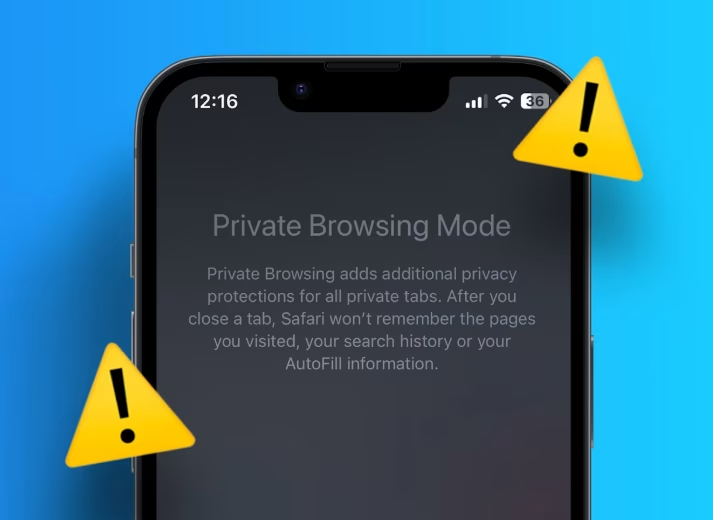
Private browsing on your iPad, available in Safari, allows you to browse the web without saving any history, cookies, cache, or personal data such as search history. When private browsing is active, Safari doesn’t retain information about the websites you visit or any search queries you make, providing you with a cleaner and more private browsing experience.
When Is It Useful?
- Browsing Sensitive Information: If you're searching for confidential information or shopping for gifts and don't want websites to remember your activity, private browsing keeps your searches private.
- Avoiding Tracking: Private browsing can prevent websites from tracking your online activity using cookies.
- Using Shared Devices: If you're sharing your device, private browsing ensures no one can see your browsing history or saved passwords.
While private browsing is incredibly useful in certain situations, there are also reasons you may want to turn it off, which we’ll cover in the next sections.
Why Turn Off Private Browsing on iPad?
There are a variety of reasons you may want to disable private browsing on your iPad. Though it’s a useful feature, it limits certain functions that are integral to a more personalized and convenient browsing experience.
1. Access Your Browsing History
When private browsing is enabled, websites you visit do not show up in your history. This can be inconvenient if you need to go back to a page you previously visited. If you need to keep track of your browsing activity or want quick access to websites you've visited in the past, it’s better to disable private browsing.
Example: Let’s say you're researching a topic for work or school. With private browsing, you won’t be able to return to the same websites easily. If you disable it, you’ll have a history of pages you can quickly revisit.
2. Enable Autofill and Password Saving
Safari can remember your passwords and other personal data, such as addresses or payment information, when you're not using private browsing. When private browsing is active, however, this functionality is disabled. If you regularly use Safari’s autofill feature to save time logging into websites or filling out forms, it’s better to disable private browsing.
Example: If you frequently shop online, you may want Safari to remember your shipping address and payment method. With private browsing off, Safari can autofill this data for you.
3. Cookies and Website Data
Cookies help websites remember your login details, preferences, and settings. While private browsing prevents cookies from being stored, some websites require cookies for functionality. For example, if you're logged into an account, private browsing will log you out as soon as the session ends, and your preferences or settings won't be saved. Turning off private browsing ensures cookies and other data are saved, making it easier to interact with websites on subsequent visits.
4. For Family or Parental Control
If you’re supervising a child’s use of the iPad, you might want to ensure that all browsing activity is recorded for review. Disabling private browsing ensures that any activity on the device is visible in the browser’s history, making it easier to monitor what the child is browsing.
Example: As a parent, you may want to check the websites your child visits. By disabling private browsing, you can easily access this data for review and ensure they are browsing safely.
How to Turn Off Private Browsing on iPad (Step-by-Step)
Turning off private browsing on your iPad is a simple and quick process. If you’ve enabled private browsing in Safari and want to switch back to regular browsing mode, follow these easy steps:
Step 1: Open Safari
Start by opening the Safari browser on your iPad. You can find Safari on your home screen, or if it’s not immediately visible, use Spotlight search to locate it quickly.
Step 2: Access the Tabs View
To turn off private browsing, the first thing you need to do is open the tabs view:
- Tap the Tabs Icon: Look for the Tabs icon in the bottom-right corner of the Safari window. It looks like two overlapping squares.
- Check for Private Browsing Mode: If you’re currently in private browsing mode, you’ll see a dark background with a “Private” label at the top of the screen.
Step 3: Switch from Private to Regular Browsing
Now that you’re in the tabs view, here’s how to exit private browsing:
- Tap the "Private" Button: At the bottom-left of the screen, you will see a button labeled "Private." Tap on it to exit private browsing mode.
- Confirm Regular Browsing Mode: After tapping "Private," Safari will automatically switch to regular browsing mode. The dark interface will change back to the normal white background, and the “Private” label will disappear.
Once you’ve completed these steps, you have successfully turned off private browsing on your iPad. Your browsing history, cookies, and passwords will now be saved again, making it easier to access sites you’ve visited in the past or use saved logins.
Troubleshooting: What to Do If You Can't Turn Off Private Browsing
If you’re having trouble turning off private browsing on your iPad, don’t worry—there are a few solutions you can try to resolve the issue.
Check Your Screen Time Restrictions
Sometimes, if you have Screen Time restrictions set up on your iPad, it can prevent you from turning off private browsing. To check if private browsing has been restricted:
- Go to Settings: Open Settings on your iPad.
- Tap on Screen Time: Scroll down and tap Screen Time.
- Content & Privacy Restrictions: Under Content & Privacy Restrictions, ensure that Safari is allowed. If Safari is restricted, private browsing will be disabled, and you won’t be able to turn it off.
Restart Your iPad
If the above methods don’t seem to work, try restarting your iPad. This can help resolve any temporary glitches in the system:
- Press and Hold the Power Button: Hold the power button until the slide to power off slider appears on the screen.
- Turn Off Your iPad: Slide the slider to turn off your device.
- Turn It Back On: Once your iPad is turned off, press and hold the power button again to turn it back on.
After the restart, try turning off private browsing again. This should restore regular browsing functionality and allow you to use your history, cookies, and saved passwords again.
By following these steps, you should be able to disable private browsing and return to regular browsing on your iPad without any hassle. If the issue persists, ensure that all restrictions are removed or consult Apple’s support for further troubleshooting.
Additional Privacy Features on iPad
In addition to turning off private browsing, there are several other privacy and security settings on your iPad that can help you enhance your browsing experience and protect your personal information. Safari, the default browser on the iPad, offers built-in features to block trackers, manage cookies, and provide transparency on your online activity. Let’s dive into these privacy features and how to enable them.
1. Prevent Cross-Site Tracking
Safari includes a feature called Prevent Cross-Site Tracking, which is designed to limit the tracking of your online activity by third-party advertisers. This feature blocks trackers that follow you from one website to another, which is commonly done for advertising purposes. Cross-site tracking is often used to create a profile of you based on your browsing behavior across various websites, which can then be used to target you with personalized ads.
How to Enable Prevent Cross-Site Tracking
- Open the Settings app on your iPad.
- Scroll down and tap Safari.
- Under Privacy & Security, toggle Prevent Cross-Site Tracking to the ON position.
By enabling this feature, Safari ensures that advertisers and websites can’t track your browsing activity across different sites, thereby protecting your privacy while surfing the web.
2. Block All Cookies
Cookies are small files that websites store on your device to remember your preferences, login details, and browsing history. While cookies can improve the user experience by enabling features like staying logged in or remembering preferences, they can also be used for tracking purposes. Blocking cookies is a good way to ensure that websites do not collect unnecessary data on your activity.
Safari offers two cookie management options:
- Block all cookies: Prevents websites from storing any cookies on your iPad.
- Allow cookies only from websites you visit: Ensures that only sites you interact with directly can store cookies, while blocking third-party cookies.
How to Block All Cookies
- Open the Settings app.
- Scroll down and select Safari.
- Under Privacy & Security, toggle the Block All Cookies option to ON.
This setting can be particularly useful if you want to increase your privacy or avoid being tracked by third-party advertisers and other web services.
3. Use Safari's Privacy Report
Safari provides a Privacy Report that gives you detailed insights into the trackers and websites attempting to follow your online activity. The Privacy Report shows which websites are trying to track you and how many trackers have been blocked by Safari. It provides transparency about how websites collect data and allows you to make informed decisions about your privacy settings.
How to Access Safari’s Privacy Report
- Open Safari and navigate to a website.
- Tap the Shield Icon located in the address bar (on the left side of the website URL).
- This will display the Privacy Report, showing details about trackers blocked on the page.
By regularly reviewing the Privacy Report, you can better understand which sites are collecting data on you and take appropriate steps to protect your privacy, such as blocking cookies or preventing cross-site tracking.
Manage Other Privacy Settings on iPad
In addition to the privacy features offered by Safari, your iPad also has a variety of system-wide privacy settings that you can customize to protect your personal information across apps and services. These settings are useful for controlling which apps and websites can access your data, location, contacts, and more.
Location Services
Location Services lets apps use your device’s GPS to determine your location. While this can be useful for navigation apps and location-based services, it can also compromise your privacy if apps access your location without your knowledge.
How to Manage Location Services
- Open the Settings app.
- Tap Privacy and then select Location Services.
- You can choose to toggle Location Services off entirely or manage which apps can access your location by selecting each app individually.
App Privacy Settings
Your iPad allows you to control which apps have access to sensitive information such as your contacts, photos, microphone, camera, and more. These privacy settings ensure that apps only access the data they need to function and prevent unauthorized access to your personal information.
How to Manage App Permissions
- Go to Settings.
- Tap Privacy and select the type of data you want to manage, such as Contacts, Camera, or Microphone.
- From here, you can toggle permissions for individual apps.
By managing these settings, you can limit the amount of personal data that apps can collect and access, reducing the risk of data breaches or misuse.
Conclusion
Turning off private browsing and using the privacy settings on your iPad are essential steps in protecting your online privacy. Safari’s built-in features like Prevent Cross-Site Tracking, Blocking Cookies, and the Privacy Report help ensure that your browsing activity is kept private, while the broader system privacy settings allow you to control how your personal data is accessed and used by apps and services.
In today’s digital world, taking control of your privacy settings is more important than ever. With the tools available on your iPad, you can browse the web with confidence, knowing that you have the power to manage your online footprint. Regularly reviewing and adjusting these settings can help you maintain your privacy and security across all your digital activities.
Start your dropshipping business today
FAQs About Turning Off Private Browsing on iPad
Can I turn off private browsing on my iPad from the mobile app?
No, you cannot turn off private browsing from the mobile app. The process must be done through Safari using a web browser. You’ll need to go to the Tabs view, where you can switch out of private browsing mode.
Does turning off private browsing save my browsing history?
Yes, when you turn off private browsing, your browsing history, cookies, and passwords will be saved again. This allows you to revisit previously visited websites and use features like autofill for forms and login credentials.
How do I know if private browsing is on?
When private browsing is active, you’ll see a dark interface in Safari with a “Private” label at the top of the screen. You can also check if you’re in private mode by looking for the "Private" button in the tabs view.
Can I recover my browsing history after turning off private browsing?
No, your browsing history during the time private browsing was enabled will not be recovered. However, from the moment you turn off private browsing, your history will be saved again, starting fresh.
Is there any way to permanently prevent private browsing on my iPad?
You can disable private browsing temporarily by checking your Screen Time restrictions under Settings. If private browsing is restricted, it will be unavailable until you remove the restrictions.


Launch your dropshipping business now!
Start free trial


Related blogs
.avif)
AliExpress vs. Spocket: Is Spocket Better Than AliExpress?
Compare AliExpress and Spocket to see which dropshipping platform offers better shipping, supplier reliability, product quality, and growth potential.


Dripshipper Reviews: Is This Coffee Dropshipping Platform Worth It?
Read this detailed Dripshipper review covering features, pros, cons, pricing, customer feedback, profitability, and better dropshipping alternatives.

Is BigBuy Legit? Honest Review for Dropshipping Businesses
Find out if BigBuy is a reliable dropshipping supplier, including its features, pros, cons, pricing concerns, reviews, and alternatives for ecommerce sellers.